|
|
Autoharp Gadget #1
The Totally Acoustical
Autoharp Resonator Box
Autoharp volume in jam sessions is a touchy subject. If the player is attending a traditional acoustical jam session, an electronic amplifier is definitely out of the question.
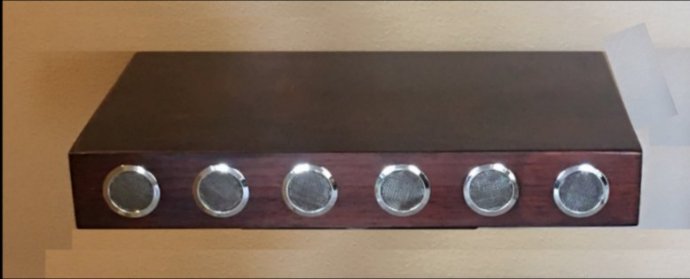
In response to this problem, I designed the Autoharp Resonator Box. It is a small wooden box with a diagonal baffle and a set of openings that reflect the sounds made upon the top of the box out towards the eagerly waiting audience.
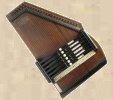
It was inspired by the autoharp case that my old friend and teacher, "Pop" Stoneman, used during his performances.
A detailed description is given below. If you are not familiar with woodworking terms, I strongly suggest that you refer to various woodworking sites via google or youtube.
Please read all of the information below before building the box.
How It Works
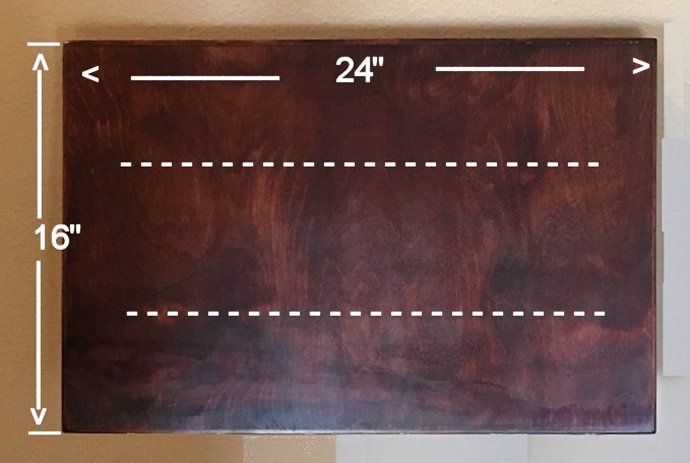
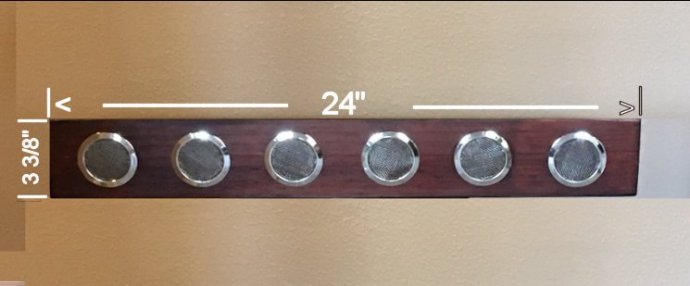
The box is a simple hollow construction, 24" wide, 16" from front to back, and 3 3/8" deep. (Note to people unfamiliar with measurement symbols. " means inch or inches. ' means foot or feet. This is completely illogical, but true.)
A simple hollow box will work as a resonating chamber, but certain physical phenomena, such as "standing waves" and a lack of an egress point for the soundwaves limit the acoustical response of a sealed box. That's why there are sound holes on guitars. It's also why the front and back of many fine guitars have a slant relative to one another.
This box is constructed with that in mind.
Parts of the Box
The box consists of seven main pieces of wood, not counting the braces, and some "dobro screens." These are as follows:
The Top
The top is 24 inches by 16 inches. This measurement includes the frame of the box. The top is made of 1/8" Baltic birch plywood.
The dotted lines represent two light spruce or boxwood braces, 1/4" thick by 3/8" high, about 22 inches long. They are spaced about a third of the way from the front and back of the box. They serve to stiffen the top and keep it from collapsing if weight is placed on it. It seemed lika a good idea at the time.
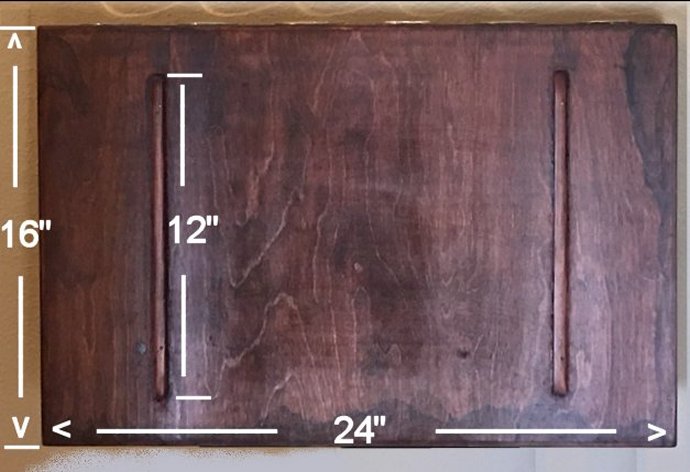
The Bottom
The bottom is also 24 inches by 16 inches. This measurement includes the frame of the box. The bottom is made of 1/8" Baltic birch plywood.
The two pieces of wood on the bottom are cleats that are 1/2" wide by 1/2" high, by 12" long. These are used if you use the slatted folding table (ASKHOLMEN) made by IKEA. This is strictly an option. You probably won't need them. I made these from some scrap wood.
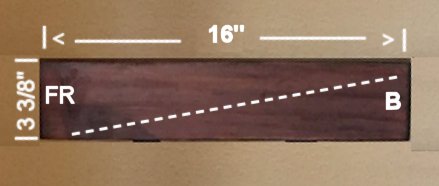
The Left Side
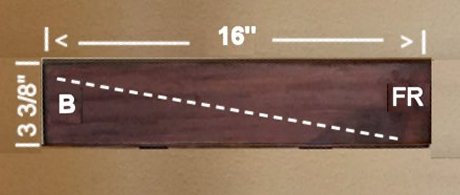
The Right Side
You will notice that the left side and right side are mirror images of one another. They are made from 3/8" thick or 1/2" thick clear pine boards, 3 3/8" wide. They are 16" long. For clarification, the letters FR refer to the front of the box, and the letter B refers to the back.
You will notice dotted lines that go from the top of the back side to a spot on the bottom about an inch from the front of the box on the inside. You should put a cleat about 10" to 12" long on the inside of the box where these lines are indicated to support the edge of the baffle. I used cleats that were about 1/2 inch square. They give a good gluing surface.
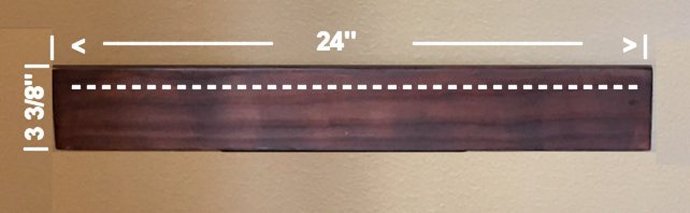
The Back
The back is fairly straightforward. It's a piece of the same pine that you make the sides from. This piece is 3 3/8" high by 24" long. The white line about an inch from the top edge is where you install a cleat to support the back edge of the baffle. I beveled mine about 10 degrees with my table saw. You could also probably do that with a sander. It's very important when you build this thing that the baffle be securely fastened. Otherwise, it might rattle.
The Front
The front of the box is the trickiest part of all. The wood is the same as the back and the sides.
You will also need some Dobro* screens. You can get these for a lot of money from Stewart Macdonald, or you can get them fairly inexpensively from Amazon. They are not absolutely necessary. However, I thought they look cool. So there. If you install the screens, which actually do have a function -- they keep your fingerpicks from falling into the box, they keep insects and vermin out, and the discourage children from poking their fingers where they don't belong -- you will need a Forstner bit. Mine is 1 7/8" in diameter.
Drill the holes for the screens and after you have stained and finished the box, glue the screens in place with five minute epoxy.
The Baffle
Ironically, the baffle is a very important part of this box, but I can't post a photo of it, because it is permanently installed inside the box, which is permanently glued together. However, I can tell you how to figure the size.
Basically, you need to build the box first.
Building the Box
First of all, you need to get all of your materials together. You will need the following:
Three pieces of pine board 3/8" to 1/2" thick, by 3 3/8" wide by 36 inches long.
One piece of Baltic birch plywood 24" by 48". It might not hurt to get an extra one that is 24" square for your baffle. Just sayin'.
A good carpenter's wood glue. I used Gorilla wood glue.
Six Dobro* screens.
Five minute epoxy.
If you have access to a brad nailer, it will come in handy. Also, a lot of good wood clamps.
I did a lot of the work with my table saw.
WARNING -- BE SURE TO USE EYE AND EAR PROTECTION WHEN YOU ARE USING POWER TOOLS.
First, you need to make the frame. Cut the pieces for the front, the back and the sides to the proper lengths. When I built my box, I decided to use rabbetted corners, and I also rabbetted the upper and lower edge of the inner edge of each of the frame pieces. This allowed the top and the bottom to sit flush with the edge of the frame. If you don't know how to do this, which you CAN do with a table saw, you can just use butt joints, and they will work just fine.
VERY IMPORTANT
Be sure to cut the holes for the Dobro screens before you assemble the box. Trust me on this.
Once you have assembled the frame, measure it to get the actual dimensions for the top and bottom.
The reason you need to do this is that if you cut rabbetts into the frame, the top and bottom will need to be slightly smaller to fit into the opening. If you just build a square frame without the rabbetts, the top and bottom will be 16" x 24" as specified in the photos. However, if you use the rabbetts, which make the whole thing look much nicer, your top and bottom will need to be about 1/2" narrower and 1/2" shorter.
Okay. You've built the frame, and you are ready to put on the bottom. Save the top for last. Glue the bottom in place and clamp or brad it. After it dries, turn the box over so the top edge is uppermost, and install the baffle cleats. Install the back cleat first. Then use it to help you install the side cleats. The cleats do not need to run the entire side lengths of the baffle. I brad nailed these into place as I built the box.
Now, measure the side to side distance. That will be the length of your baffle. Then measure the distance from the back of the box to the point where the baffle will contact the bottom at the front of the box (about 1" from the front). Saw a piece that is about 1/4" wider than you think you will need, and check to see if it makes secure contact all the way from the front to the back. If it's too long, trim it a little, until it fits.
If you take off about 1/16" at a time, you will finally hit the right spot. You can fudge a little where the baffle contacts the back cleat.
Once you have the baffle fitting correctly, glue it into place and secure it with brads.
Now you are ready to stain the box and finish it. I used some deep mahogany stain I got at Rockler's, and finished it with Varathane satin finish spray.
Return to home page.
*Dobro is a registered trademark of Gibson, USA.
copyright 2020, by Bill Palmer. All rights reserved.
To contact Bill send an email to
bill@billpalmer.com.
| |